Depending on the account type (trial or billing), either the Upgrade Account or Balance section is displayed at the top of the dashboard panel.
- The default type for the accounts is trial, which provides a free-of-charge 14 days hosting period. thats is limited by the number of provided resources, allowed environments/nodes, etc.

Expand the Upgrade Account drop-down menu to see the following options:
- Use the Upgrade Account button to get a fully functional account with no limitations.
- The Learn about Trial Limitations option opens the appropriate Account Limits tab within the Quotas & Pricing frame.
- Click on Learn about Pricing to be redirected to the documentation page with information about the pricing model.
- Select the See statistics on recent resource usage option to open the account’s billing history.
2. Billing accounts are spared from any limitations but are charged according to the hosting provider’s pricing.

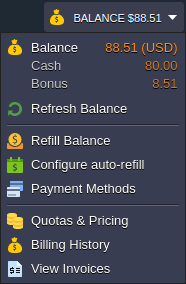
Click the Balance button to expand a list of the following options:
- Balance shows the current balance of the account (both Cash and Bonus). By clicking on the section, you can open the Refill Balance tab.
- Refresh Balance option updates balance data to the most actual value.
- Click on Refill Balance to submit the payment.
- Configure auto-refill to enable automatic refill of the account balance (based on the following conditions: Weekly, Monthly or when Balance less than specified sum).
- Payment Methods option gives an opportunity to choose the default payment method for the account or add a new one.
- Click on the Quotas & Pricing item to see the information frame with a set of tabs about platform Regions (if multiple ones are available), Pricing, and Account Limits.
- Billing History shows account spends for the specified period.
- Click on the View Invoices option to go to the external billing system panel with the account invoices, orders, payments, etc.

